Monday, July 30, 2012

DIY Painted Coasters

You can never have too many coasters, right?  You can change them out seasonally or have them ready and available when you have guests.  They even make great gifts to give!  Making your own coasters is a great idea.  They are an easy DIY craft, inexpensive, and fun to make.  You can find a variety of different kinds to make.  I have tackled felt ones and tile ones.  I really wanted to try cork ones.  I have also been really into all the chevron patterns I have been seeing and all of the lovely monogrammed items I have found, so for today's tutorial, I decided to use both!


For supplies, you will need cork coasters, paint, paint brushes, a ruler or chevron stencil, letter stencils, and tape.


First, I decided to use a white background, so I painted one side of the cork white and let it dry completely.


Once the paint was dried, I used the ruler to create a chevron pattern.  I marked a small 'x' on the lines I wanted to paint.


After I had all my lines drawn, I painted in the lines with a navy blue color.  Let the paint dry completely before you move on.


The final step was to use my 'L' stencil and a bright green paint to monogram them.


I also made a striped variety too.  To start, I painted a white background and let it dry.  Then I used painters tape to make the stripes.  I decided to paint my stripes a golden yellow.


After the paint had dried, I used the 'L' stencil and the navy blue color for the monogram.


I really like how these two varieties look together, so I think they will find their new home in our living room for now!


Featured on:


Linked to:


Wednesday, July 25, 2012

On My Bookshelf

OK, so I just finished reading the Fifty Shades of Grey Trilogy.  I had to read it to see what all this fuss is about.  I must say that I did like the books!  I think the third was my favorite, followed by the second, and then the first being my least favorite.  So many women I know have read them, it is hysterical how gaga some people are about it.  Not to mention when they start talking about the movie coming out and how adamant some of them are about who should play Christian Grey.  Too funny!  Did you read Fifty Shades of Grey?  Did you enjoy it?


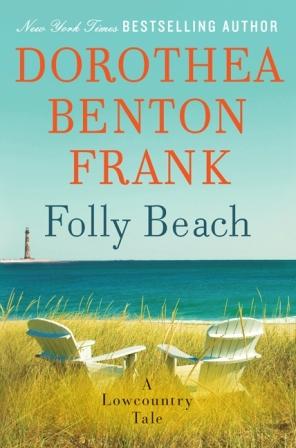
Up next, I am going to read a book I received this past Christmas.  Folly Beach by Dorthea Benton Frank!  I am hoping it will take me back to a great vacation a couple of summers ago!

source


Tuesday, July 24, 2012

Italian Style Cheese-Filled Chicken

This recipe is one of my favorites.  It is simple and quite tasty.  Perfect for a special dinner at home or even for entertaining.  The combo of the cheese and creamy sauce with the chicken is delicious!


Cheese-Filled Chicken

(This is a recipe for 2, but you can adjust it as needed.)

You will need:

2 skinless boneless chicken breasts
1/4 cup pancake mix
1/4 cup italian bread crumbs
1/4/ cup grated romano cheese
2 slices mozzarella cheese
1/2 lb. fresh mushrooms, sliced
1/2 small onion, thinly sliced
1/2 cup water
1/2 cup milk
1 tbsp. flour
1 chicken flavored bouillon cube
1/4 cup white wine (or water if you prefer)
5 tbsp. butter for frying

Directions:

Cut the chicken breasts into cutlets and pound the chicken until it is about 1/8 of an inch thick.  Mix together pancake mix, bread crumbs, and grated romano cheese.  In a large skillet melt about 3 tbsp. butter over medium heat.  Coat the chicken in the breading mixture and then fry them until they are lightly browned on both sides.  Remove the chicken from the skillet and arrange a slice of mozzeralla cheese on each and top it another piece of the chicken cutlet.  Set aside.

In the pan drippings, melt about 2 tbsp. of butter over medium heat.  (Sometimes, I don't need to add more butter at this point.)  Add the mushrooms and cook until tender.  Add the onions and saute them until they are translucent. 

Mix together the water, milk, and flour.  Add this to the mushroom and onion mixture.  Add the wine and the chicken flavored bouiloon.  Heat to boiling.  Stir to loosen the pan drippings.  Place the chicken cutlets in the skillet.  Cover and simmer for about 5 minutest until the cheese is melted.  Spoon chicken and sauce onto a platter.


Sunday, July 22, 2012

Raleigh Flea Market

I love a good flea market, but they are not easy to find in our area.  We have really great ones in Ohio, but have had to search high and low here on the east coast of North Carolina.  I found one in Raleigh that looked intriguing, so we checked it out.

We pulled up and I couldn't hold my excitement, I mean it does take up the majority of the state fairgrounds!  This picture does not do it justice.


Saw these cute little vintage glasses.


Unfortunately (?) this cat statue did not make the cut today.


Loved these vintage Canasta cards!


Brad found a little pit stop.


A giant ice cream cone.


Saw this cute retro cake carrier.


PYREX MECCA!! (all to expensive for my blood...I can find better bargains around here.)


Brad always checks out the records to find gems for our collection.  He ran across this one and had to show me.  I didn't even realize they made the soundtrack into a record! Lol.


Oh my.  All sorts of sour cream glasses.  It was time to break down and start a collection.


Found a bead store!


And on the other side of the building...more outside booths!


This guy had two huge trailers filled with these really cool cast iron pieces.


Overall, we had a great day!  We decided we will definitely need to come back!  As for our finds, Brad found this cool 50's Ohio glass.  It has Akron marked on the map.  I found this sour cream glass and have decided to start my collection.  I think they will look adorable with our Fiesta ware!


Linked to:


Saturday, July 21, 2012

DIY Door Hanger


This little crafty mash-up is really inspired by two different crafts I have found. 


Nap Time Crafters created this adorable door hanger for Halloween.

source

I love the idea of both, so I decided to combine them.

First, I typed up the saying, chose a font and printed it out to use as a template.  Then I gathered up some black felt, scissors, and pins.


Next, I started cutting out the letter template and then using that to cut the felt.  I used the pins to secure the paper letter onto the felt. 


Here are all my letters cut out and ready to go!  They are not perfect by far, but I am going for a shabby chic kind of look. ;)


Next, I grabbed 3 embroidery hoops of equal size and I grabbed this cool vintage fabric from my fabric stash.  Then, I secured the fabric in the embroidery hoop.


Before I started stitching, I tried to lay out the letters and space them where I wanted them to go.


For stitching, I decided to hand stitch the letters using black embroidery floss.  Easy peasy.


Once the letters were stitched on, I trimmed off the excess fabric from the embroidery hoops and used a hot glue gun to secure them together.  Then I used a ribbon for hanging.


Oh, and by the way.  While I was crafting, this is what Miss Maggie Mae was doing.


Snoozin' away...what a life!


Linked to: